Installation
aMule is a multi-platform eD2k / Kad client, officially supported on Windows, macOS, Linux, FreeBSD and OpenBSD (x86_64 and ARM64). As portable C++/wxWidgets code it can usually be compiled on other Unix-like systems and CPU architectures too, though those are not officially supported.
Reinstalling aMule or moving it to a new computer? See Backup and Restore to keep your settings, credits and downloads.
Supported Platforms
The project publishes official pre-built binaries only for Windows, macOS and Linux; on the other supported platforms aMule is installed through the system package manager or built from source. Version and architecture requirements for the official binaries are listed in each platform's section below.
| Platform | Architectures | How to install |
|---|---|---|
| Windows | x64, ARM64 | Official installer or portable build |
| macOS | Apple Silicon, Intel | Official .dmg |
| Linux | x64, ARM64 | Official AppImage or Flatpak, or distribution package |
| FreeBSD | x86_64, ARM64 | System package or Ports |
| OpenBSD | x86_64 | System package |
Additionally, an unofficial Docker image runs aMule on any platform with a container runtime.
Downloads
The latest release is available on the Downloads page, which links directly to the GitHub releases page. Each release provides the following artifacts:
aMule-<version>-Windows-Setup-x64.exe— Windows installer for x86_64aMule-<version>-Windows-Setup-arm64.exe— Windows installer for ARM64aMule-<version>-Windows-x64.zip— portable build for Windows x86_64aMule-<version>-Windows-arm64.zip— portable build for Windows ARM64aMule-<version>-macOS-universal2.dmg— Universal2 disk image for macOS (Apple Silicon + Intel)aMule-<version>-Linux-x64.AppImage— portable Linux binary for x86_64aMule-<version>-Linux-arm64.AppImage— portable Linux binary for ARM64aMule-<version>-Linux-x64.flatpak— Flatpak bundle for x86_64aMule-<version>-Linux-arm64.flatpak— Flatpak bundle for ARM64aMule-<version>-Linux-x64-static.tar.gz— fully static, dependency-free headless build for Linux x86_64aMule-<version>-Linux-arm64-static.tar.gz— fully static, dependency-free headless build for Linux ARM64aMule-<version>-src.tar.gz— official source bundle (preferred over GitHub's auto-generated "Source code" archive; ships pre-rendered man pages)- Source code (
<version>.tar.gzand<version>.zip) — automatically attached by GitHub to every release.
Every official pre-built package bundles the complete set of aMule executables: the interface clients amule, amuled, amulegui, amuleapi, amulecmd and amuleweb, plus the standalone utilities ed2k, alc, alcc, wxcas and cas. Each platform section below covers how to launch a specific component. (Distribution packages may instead split these across several packages, and the Linux static binaries archive is a headless-only exception — it ships just amuled, amuleapi and amulecmd.)
Windows
aMule is distributed for Windows in two formats: an installer (.exe) that sets up Start menu shortcuts and an Add or Remove Programs entry, and a portable build (.zip) that runs from any folder without installation. Both contain the same full set of aMule executables and bundled runtime libraries. Choose whichever fits your workflow.
Requirements
- Windows 10 or 11
- x64 or ARM64 processor
Installer
-
Go to the Downloads page and click the Windows section, or go directly to the latest release.
-
Download the installer that matches your architecture:
aMule-<version>-Windows-Setup-x64.exefor most PCs (Intel/AMD)aMule-<version>-Windows-Setup-arm64.exefor ARM-based Windows devices (Snapdragon X Elite, Surface Pro X, etc.)
-
Run the downloaded
.exeand follow the on-screen steps. The installer needs administrator rights and installs aMule intoC:\Program Files\aMule\by default (the executables are in itsbin\subfolder). -
On the Choose Components page, choose the optional components:
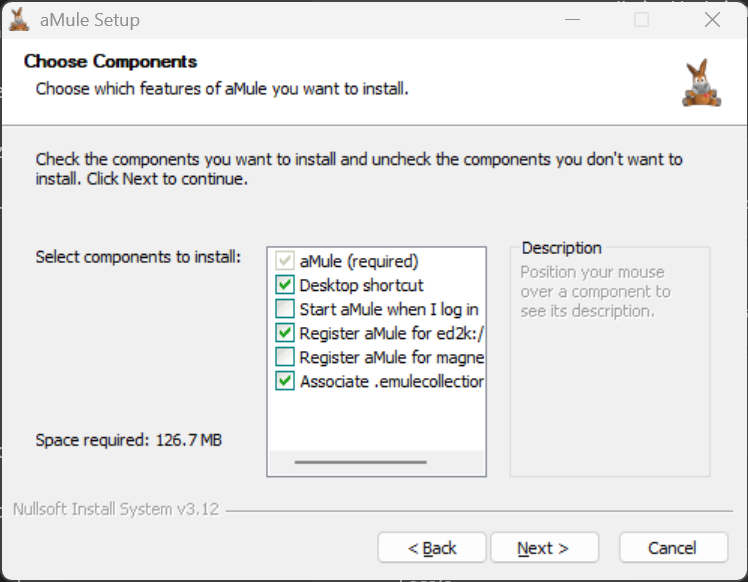
Component Default Effect aMule (required) Always installed The aMule program files, Start menu shortcuts and the uninstaller. Desktop shortcut On An aMule shortcut on the desktop. Start aMule when I log in Off Starts aMule automatically when you log in — see Starting aMule Automatically. Register aMule for ed2k:// links On Makes aMule the handler for ed2k://links clicked in a browser.Register aMule for magnet: links Off Makes aMule the handler for magnet:links. Leave it off if you use a BitTorrent client: aMule only handles eD2k-compatible magnet links.Associate .emulecollection files On Opens .emulecollectionfiles with aMule.
The last four are per-user settings that can be changed later in Preferences → General; see eD2k and Magnet Links for the link and file associations.
The installer creates Start menu shortcuts — in a folder you choose on its Choose Start Menu Folder page — for aMule, aMule Daemon (amuled), aMuleGUI (remote) (amulegui) and Uninstall aMule, and an entry in Add or Remove Programs for clean uninstallation. aMule stores its configuration in %APPDATA%\aMule\ (C:\Users\<you>\AppData\Roaming\aMule\). The uninstaller keeps this folder, so your settings and downloads are preserved, unless you tick Remove user data (config, ED2K servers, Kad nodes, partfiles) (off by default); to keep a copy anyway, see Backup and Restore. When you upgrade, your configuration is kept, but the components are applied again as selected: tick Start aMule when I log in and Register aMule for magnet: links again if you use them.
Portable
- Go to the Downloads page and click the Windows section, or go directly to the latest release.
- Download the
.zipfile that matches your architecture:aMule-<version>-Windows-x64.zipfor most PCs (Intel/AMD)aMule-<version>-Windows-arm64.zipfor ARM-based Windows devices (Snapdragon X Elite, Surface Pro X, etc.)
- Extract the
.zipfile to a folder of your choice (e.g.C:\Users\<you>\aMule). It contains a singleamule-portable-<arch>folder. - Open its
binsubfolder and runamule.exe.
The portable build requires no installer; the link and file associations and autostart can be turned on from Preferences → General. aMule stores its configuration in %APPDATA%\aMule\ (C:\Users\<you>\AppData\Roaming\aMule\) and can be moved or deleted by simply moving or deleting the extracted folder.
SmartScreen Warning
Windows Defender SmartScreen may show a warning when you run the installer or amule.exe, because the aMule binaries are not code-signed. This is expected for open-source software distributed outside the Microsoft Store. To proceed:
- Click More info in the SmartScreen dialog.
- Click Run anyway.
macOS
Requirements
- macOS 11.0 (Big Sur) or later
- Apple Silicon (M1/M2/M3/M4) or Intel — the
.dmgcontains a Universal2 binary that runs natively on both
Installation
- Go to the Downloads page and click the macOS section, or go directly to the latest release.
- Download
aMule-<version>-macOS-universal2.dmg. - Open the
.dmgfile. A window appears with two applications —aMule.app(the all-in-one client) andaMuleGUI.app(the remote GUI that connects to a runningamuled) — and a shortcut to the/Applicationsfolder. - Drag
aMule.app(andaMuleGUI.app, if you want the remote GUI) into the/Applicationsfolder. - Eject the disk image.
- Open
aMule.appfrom/Applicationsor Launchpad.
After installing, see the macOS configuration guide for macOS-specific considerations such as context menus, firewall access, and handling ed2k:// and magnet: links.
Gatekeeper Warning
The .dmg is distributed unsigned (the project doesn't have an Apple Developer Program subscription). macOS Gatekeeper will block the first launch with a message like "aMule cannot be opened because the developer cannot be verified." The procedure to allow it once depends on the macOS version.
macOS 15 (Sequoia) and newer
Apple removed the Control-click → Open bypass in macOS 15. The supported path is now:
- Double-click
aMule.app— the warning dialog appears, click Done to dismiss. - Open System Settings → Privacy & Security.
- Scroll to the security message about aMule being blocked, click Open Anyway.
- Re-launch aMule and confirm in the dialog. macOS remembers the exception; subsequent launches go straight in.
macOS 14 (Sonoma) and earlier
Control-click aMule.app → Open → Open in the dialog. macOS remembers the exception; subsequent launches go straight in.
Terminal alternative (any macOS version)
Strip the quarantine attribute, no UI clicks required:
xattr -d com.apple.quarantine /Applications/aMule.app
Additional binaries
The aMule.app bundle also includes the other components inside aMule.app/Contents/MacOS/ — amuled, amuleapi, amulecmd, amuleweb, ed2k, alc, alcc, wxcas and cas — which can be run directly from the terminal:
/Applications/aMule.app/Contents/MacOS/amuled --version
The Web UI assets served by amuleapi are in aMule.app/Contents/Resources/amuleapi-static/.
Linux
Linux users can install aMule through four methods: an AppImage (self-contained portable binary), a Flatpak (sandboxed package), static binaries (a fully static, dependency-free headless build), or a distribution package installed via the system package manager. For headless server setups, see also the static binaries below and the unofficial Docker image.
AppImage
The AppImage is the simplest installation method — no package manager or root access is needed.
System requirements: glibc ≥ 2.35. This covers the following distributions (and later versions):
- Ubuntu 22.04 LTS and later
- Debian 12 (Bookworm) and later
- Fedora 38 and later
- openSUSE Leap 15.5 / Tumbleweed
- Arch Linux (rolling)
- Linux Mint 21 and later
- Pop!_OS 22.04 and later
- Steam Deck (SteamOS 3)
- Raspberry Pi OS (Bookworm)
Installation:
- Go to the Downloads page or the latest release.
- Download the AppImage for your architecture:
aMule-<version>-Linux-x64.AppImagefor standard PCsaMule-<version>-Linux-arm64.AppImagefor ARM64 boards and devices
- Make the file executable and run it:
chmod +x aMule-<version>-Linux-x64.AppImage
./aMule-<version>-Linux-x64.AppImage
The AppImage is fully self-contained — it bundles wxWidgets and all required shared libraries. No system libraries need to be installed. To uninstall, delete the .AppImage file.
Desktop integration
On its first launch the AppImage asks Add aMule to your application menu?. Click Install to:
- add aMule and aMuleGUI (the remote GUI) entries to your application menu, with their icons;
- install the
.emulecollectionfile type and the desktop entries that the link and file associations rely on; - create a symlink in
~/.local/binfor each bundled command (amuled,amuleapi,amulecmd,ed2k, …), so you can run them by name if~/.local/binis in yourPATH.
Click Not now to skip it for this launch, or tick Don't ask again to stop the prompt. The entries point at the AppImage's location; after moving the file, delete ~/.local/share/applications/org.amule.aMule.desktop so that the prompt appears again.
Tools such as AppImageLauncher can add a menu entry too, but the link and file associations need aMule's own desktop integration.
System tray icon is transparent. The system tray icon appears without a logo until the aMule icons are installed. Click Install in the Add aMule to your application menu? prompt to fix it.
GTK theme is not applied. The AppImage bundles its own GTK libraries and does not use the GTK theme installed on the system. The application is functional but may not match the desktop theme.
Running other components from the AppImage
The AppImage bundles every aMule executable in a single file. Invoking the AppImage directly runs amule (the GUI); the component that runs is otherwise selected by the name used to invoke the AppImage — amuled, amulegui, amuleapi, amulecmd, amuleweb, ed2k, alc, alcc, wxcas or cas. Passing the component name as an argument (./aMule-<version>-Linux-x64.AppImage amuled) does not work: it starts the GUI.
The desktop integration prompt creates these symlinks in ~/.local/bin for you. To create them by hand, make one symlink per component you want to use, named after the binary:
# one symlink per component you want — for example:
ln -s aMule-<version>-Linux-x64.AppImage amuled
ln -s aMule-<version>-Linux-x64.AppImage amuleapi
ln -s aMule-<version>-Linux-x64.AppImage amulecmd
ln -s aMule-<version>-Linux-x64.AppImage ed2k
Then invoke each symlink directly:
./amuled
./amuleapi --set-admin-pass=yourpassword   # store the Web UI admin password, then exit
./amuleapi
./amulecmd
./ed2k "ed2k://|file|..."
Flatpak
The Flatpak bundle runs in a sandboxed environment and is suitable for distributions that ship Flatpak support.
Requirements: Flatpak. The bundle targets the GNOME 50 runtime (org.gnome.Platform), which Flatpak installs automatically when you install the bundle.
Installation:
flatpak install ./aMule-<version>-Linux-x64.flatpak
After installation, run aMule with:
flatpak run org.amule.aMule
To install from Flathub (once the submission is accepted):
flatpak install flathub org.amule.aMule
The Flatpak runs in a sandboxed environment. Network access is granted by default, but access to paths outside the home directory may require additional --filesystem permissions. If a component cannot reach a file or socket, pass the needed permission explicitly:
flatpak run --filesystem=/mnt/data --command=amuled org.amule.aMule
Running other components from the Flatpak
The Flatpak bundle also includes every aMule executable. Use the --command flag with flatpak run to select which binary to execute:
flatpak run --command=amuled org.amule.aMule
flatpak run --command=amuleapi org.amule.aMule --set-admin-pass=yourpassword   # store the password, then exit
flatpak run --command=amuleapi org.amule.aMule
flatpak run --command=amulecmd org.amule.aMule
flatpak run --command=ed2k org.amule.aMule "ed2k://|file|..."
Static binaries
The static binaries are a fully static, precompiled build (linked against musl libc) of aMule's headless components — amuled, amuleapi (the REST + Web UI daemon) and amulecmd. The binaries carry no shared-library dependencies, so they run on any x64 or ARM64 Linux system regardless of glibc version or installed libraries — well suited to servers, containers, minimal distributions, and systems too old for the AppImage.
It does not include the GUI (amule, amulegui); for a desktop install use the AppImage or Flatpak instead.
Installation:
- Go to the Downloads page or the latest release.
- Download the tarball for your architecture:
aMule-<version>-Linux-x64-static.tar.gzfor standard PCsaMule-<version>-Linux-arm64-static.tar.gzfor ARM64 boards and devices
- Extract it and run the component you need directly:
tar xzf aMule-<version>-Linux-x64-static.tar.gz
cd aMule-<version>-Linux-x64-static
./amuled
See amuled → Configuration to set up External Connections before connecting amulecmd or amuleapi to it.
The archive extracts to a single aMule-<version>-Linux-x64-static/ folder containing the amuled, amuleapi and amulecmd binaries (plus the amuleapi-static/ folder with the bundled Web UI assets). Nothing is installed system-wide; to uninstall, delete the folder. HTTPS downloads (IP filter, IP2Country database, server lists) use the host's CA certificate bundle, so install your distribution's ca-certificates package on minimal systems.
Distribution Packages
Many Linux distributions include aMule in their official repositories. The version may lag behind the latest release. To get the most recent version, use the AppImage or Flatpak.
Debian and Ubuntu
sudo apt update
sudo apt install amule
To also install the daemon, WebUI, and command-line client:
sudo apt install amule amule-daemon amule-utils amuleapi
Fedora
aMule is available in Fedora's official repositories:
sudo dnf install amule
For a headless setup (daemon, WebUI, and command-line client without the GUI), install the amule-nogui subpackage instead:
sudo dnf install amule-nogui
Arch Linux
aMule is in the official Arch Linux repository:
sudo pacman -S amule
Alternative and development builds are also available in the AUR.
Gentoo
emerge -av net-p2p/amule
To control which components are built, use USE flags:
USE="daemon webserver amulecmd nls upnp geoip" emerge -av net-p2p/amule
BSD
FreeBSD
Binary package
pkg install amule
Ports Collection
cd /usr/ports/net-p2p/amule
make config    # select components (daemon, web server, CLI, etc.)
make install clean
OpenBSD
pkg_add amule
NetBSD
Using pkgin:
pkgin install amule
Using pkgsrc:
cd /usr/pkgsrc/net/amule
make install clean
Docker
An unofficial Docker image, maintained by a member of the aMule Team, is available at ngosang/docker-amule. It runs amuled with amuleapi enabled — serving the REST API and browser Web UI on port 4711 — a headless setup suited to home servers and NAS devices. The image is Linux-based, but it runs on any system with a container runtime, including Windows and macOS via Docker Desktop. Images are published on Docker Hub (ngosang/amule) and GitHub Container Registry for a wide range of architectures (x64, ARM, RISC-V and more).
A minimal Docker Compose setup:
services:
  amule:
    image: ngosang/amule
    ports:
      - "4711:4711"     # amuleapi REST API & Web UI
      - "4712:4712"     # External Connections (amulegui, amulecmd, amuleapi)
      - "4662:4662"     # eD2k client-to-client TCP (required for High ID)
      - "4665:4665/udp" # eD2k server UDP (global searches)
      - "4672:4672/udp" # extended eMule protocol and Kademlia UDP
    volumes:
      - /path/to/config:/home/amule/.aMule
      - /path/to/downloads:/downloads
Once the container is running, open the Web UI at http://<host>:4711 or connect amulegui to port 4712. See the repository documentation for the full list of environment variables (user/group IDs, passwords, timezone) and optional features.
The Docker image is built from the official aMule source code but is not an official aMule project distribution. Issues with the image should be reported on its own issue tracker.
Building from Source
If no pre-built binary is available for your platform, or you want to compile a specific version or custom configuration, see the Compilation documentation for full instructions, dependency lists, and build options for Linux, macOS, Windows, and BSD.
After Installation
Once aMule is installed, the first launch creates the configuration directory:
| Platform | Path |
|---|---|
| Windows | %APPDATA%\aMule\ |
| macOS | ~/Library/Application Support/aMule/ |
| Linux / BSD | ~/.aMule/ |
See the aMule Files Reference for a complete description of every file and directory created by aMule.
aMule ships with reasonable defaults and can be used as-is. To connect to the eD2k network and start downloading, follow the Quick Start Guide, which walks through the first-run setup wizard (nickname, bandwidth, networks and ports, bootstrap files, desktop integration and folders), connecting to eD2k and Kademlia, and your first search.
aMule can also be set up to start automatically when you log in and to open ed2k:// and magnet: links clicked in your browser; the first-run wizard offers both.
To receive a High ID (required for optimal connectivity and download speeds), you will need to open aMule's ports on your firewall or router. The Firewall configuration page explains how to do this.